I have been so scattered lately, I can't even tell you. First of all, we've had several visitors during the last few weeks (finally!), and I also decided that I wanted to do something about my dark basement work space. So, I did a lot of painting and reorganizing, and my husband built me two new tables (yay!) and now I have a much bigger, brighter, better-planned studio that does not use old packing boxes for walls.
I also have a new photography set-up, but--even after a whole day of maneuvering lights and taking test pictures--I'm still in the tweaking process. Please forgive the (mostly overexposed) pictures. I'll figure it out eventually.
Despite some effort, I've failed to find a good solution for the historical Rapunzel's hair--even though I thought that the idea of adding detachable curls was brilliant. For some reason I have not been able to get the hair to curl nicely...or I've been too busy to give it my best effort. Anyway, with 50 responses to my poll, about 59.6% of you told me to leave the hair alone, so I'm feeling comfortable with that choice. If I do find a way to curl the hair, I'll include photos of that when I do the group shots of the two Rapunzels.
I needed a quick break from princesses, though, so today I'll show you my latest My Way Kid. I named her Rosa:
 |
My Way Kid doll with medium vinyl and the Tender face.
|
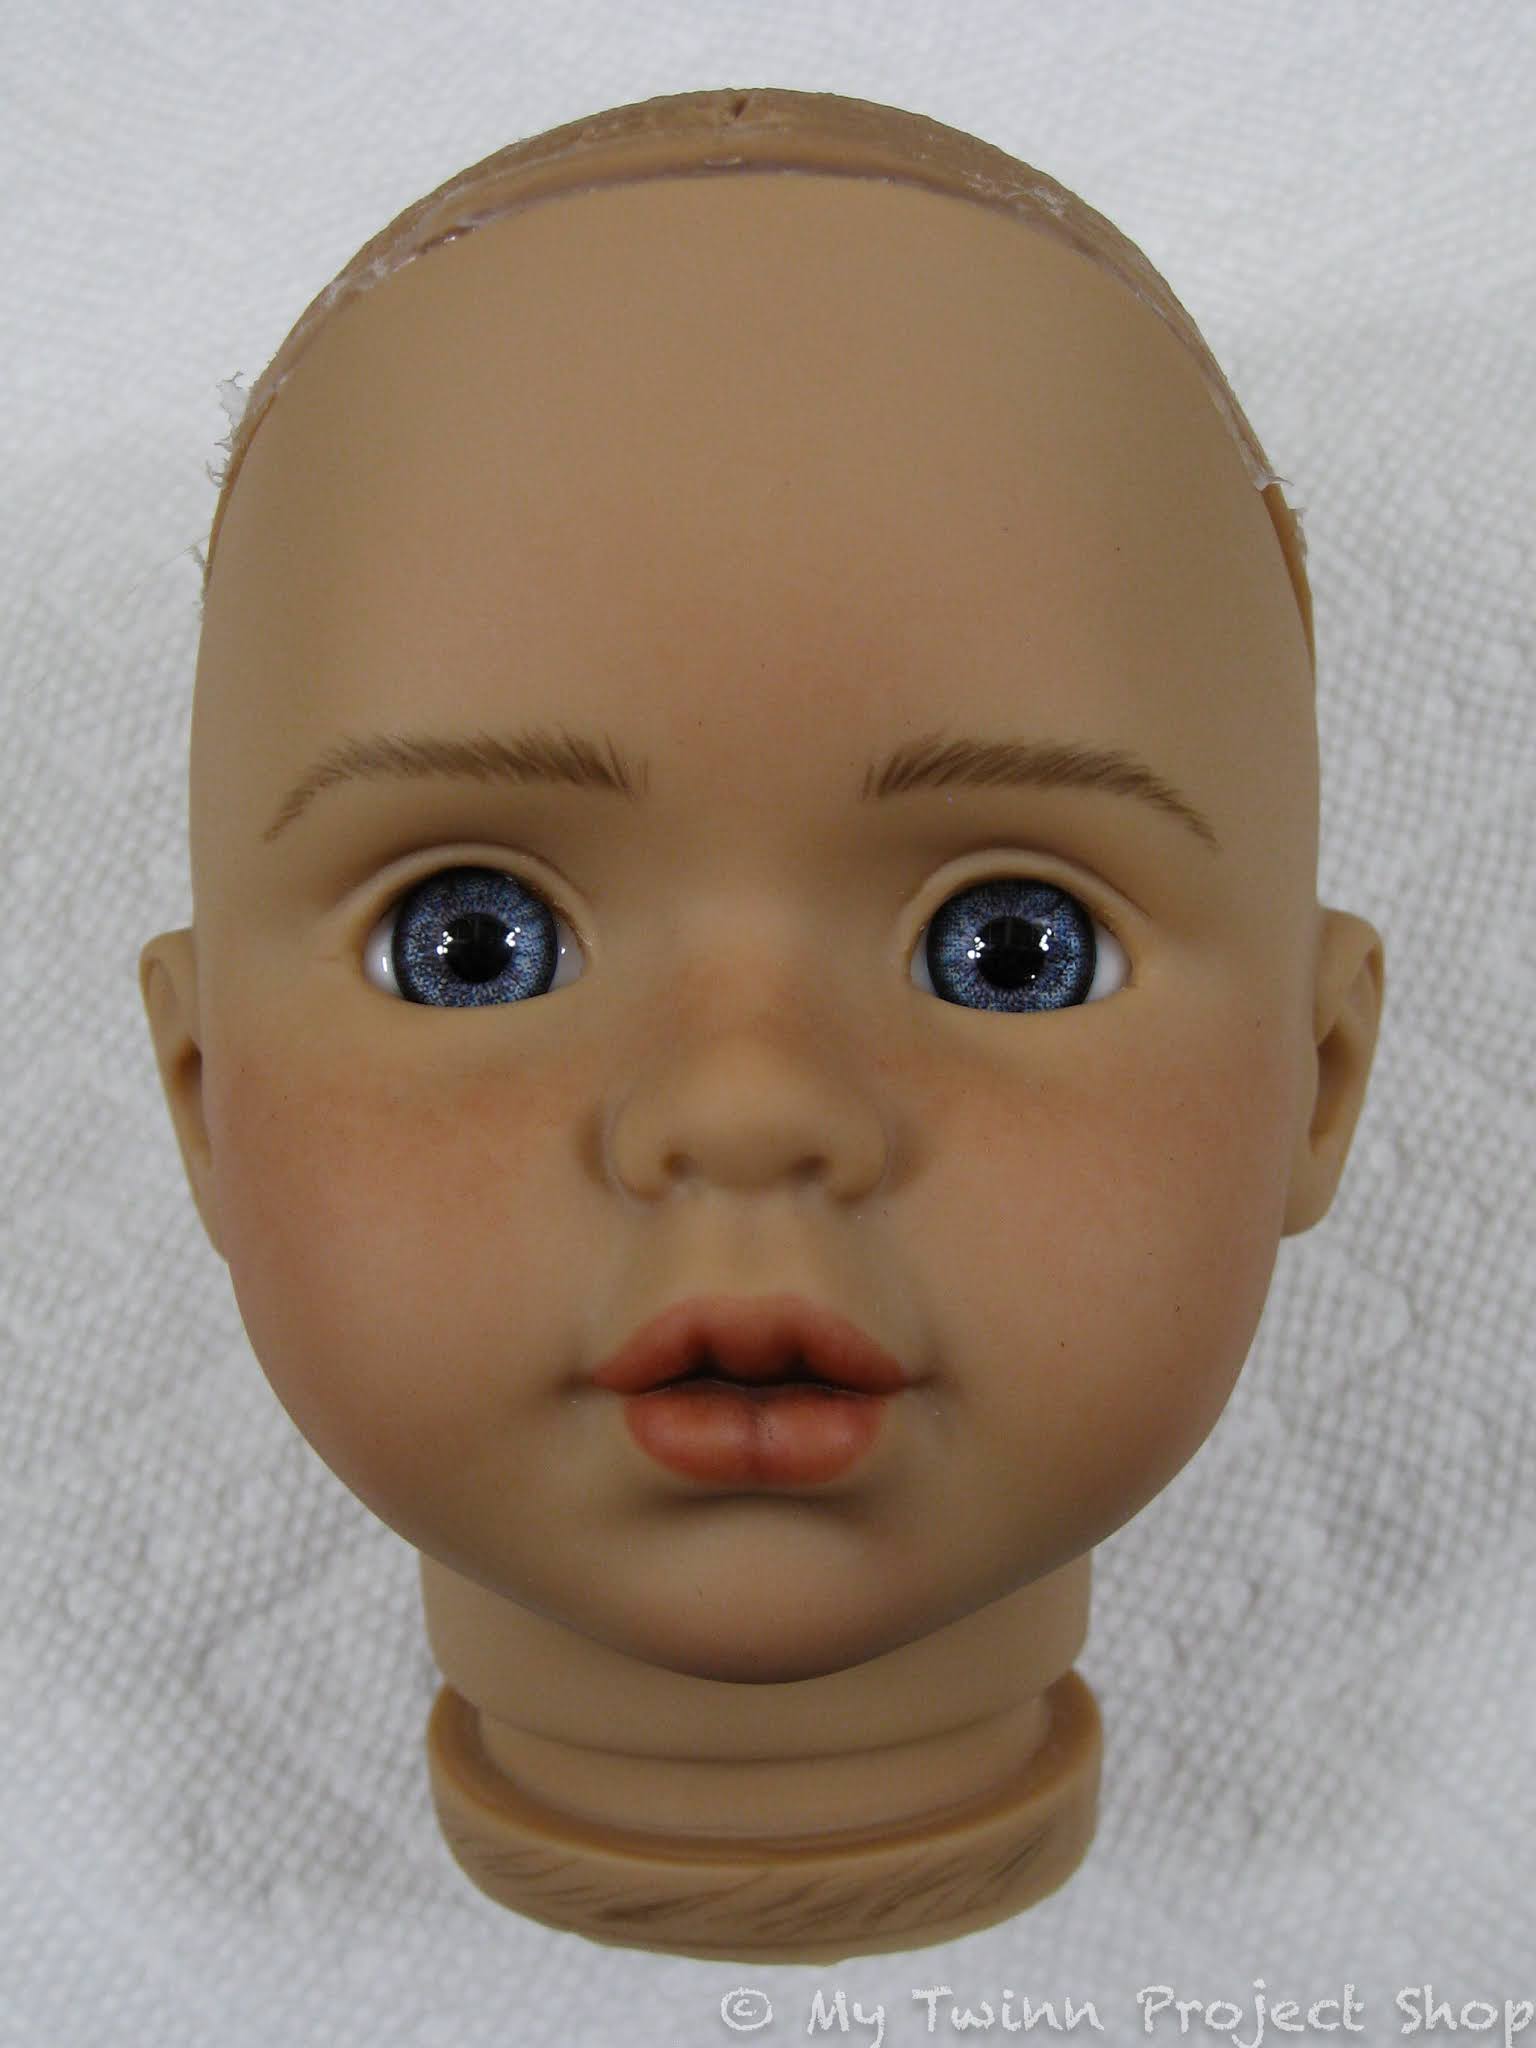
This is the first doll that I've worked on who has the Tender face mold. After watching a fair number of My Way Kid eBay auctions, my suspicion is that this is the least popular of the three face molds.
I instinctively prefer the impish smiles on the other two faces, but I was still excited to try painting this mold for the first time--especially with that nicely-detailed mouth.
Rosa came to me in decent shape:
She had bright blue eyes and a cute bobbed wig with nice, even bangs:
Her fabric torso had some small stains on it, though:
And she smelled a little bit musty--like she'd been in storage for a long time.
She also had visible stitching around her vinyl seams, which is a fairly common occurrence with this brand:
On closer inspection, her eyes had a lot of yellowed glue caked around the sockets, but this is hard to see with the wig in place:
As I was taking the wig off, I made a discovery.
I was working on another doll at the same time (for reasons I'll share in a sec), and I assumed that both girls were blondes. However, when I got them under my work table lights, I realized that there was a difference in their hair colors!
The girl on the right is more of a strawberry blonde:
They also both have blue eyes, but Rosa has much brighter eyes than the other doll. Perhaps this is the light blue color that I mentioned in my earlier post?
Anyway, back to Rosa.
I removed her wig and got a better look at her eyes and face paint:
Here you can get a better look at the glue in the right eye socket:
And here are both eyes up close:
You might also notice that Rosa's factory eyebrows were a little off-center (the right eyebrow is shifted towards the center of the face).
So, I popped out the old eyes...
...and did my best to clean up the glue mess. I was able to get a lot of the glue off with careful sanding and acetone, but, wow. I really dislike super glue!
After I stripped away Rosa's old face paint, I coated her head with sealant and placed some new dark blue glass eyes:
 |
| Much better, I think. |
As I was painting Rosa's face, It occurred to me that a little bit of shading inside of the mouth might make the open-lipped shape look more realistic.
The idea was good, but my first effort at shading was not so good:
 |
| Oof. |
I got a little too heavy-handed with the brown paint. I think the effect is ok from a distance, but up close it's really bad:
The dark areas are too abrupt (and too dark).
So, I wiped the mouth clean...
...and tried again:
There's still a lot of shading, but the shaded color is more compatible with the rest of the mouth.
As you can see, I also gave Rosa some rosy cheeks and a smattering of freckles--as is my habit.
I also gave Rosa some dark brown upper eyelashes and a lovely medium-brown curly wig from ZaZou, and then I reunited her with her body:
The wig looks a little red in that photo. It has some subtle red highlights that show up especially well in my photos for some reason, but in real life the hair is mostly a mixture of lovely brown shades. In the ZaZou shop the color is called "Butterscotch ombre."
I still haven't completely figured out what my general approach to the My Way Kid bodies should be. I let the waist seams out and re-shape the ankles on all of the dolls I work on, but I'm still conflicted about disassembling the body. On the one hand, I like to take the bodies apart so that I can reinforce limbs and glue down the vinyl-to-fabric seams. On the other hand, it's hard to get the bodies to look like new once I've taken them apart.
In Rosa's case, I pretty much had to take the body apart because it needed to be deep-cleaned. In addition, she had a loose arm that I wanted to glue more securely.
When I got the body put back together, there were some problems. First of all, the neck fits strangely into the body, exposing the indented vinyl where the cable tie fits. Also, I felt that the seam at the side of the neck made the cable tie itself way too visible (there was a big gap in the fabric in that area).
I couldn't do much about the horizontal gap in the neck seam. This is how it looks now:
I used some extra fabric to make a little patch to cover the visible cable tie, though. This is what that area looks like now:
 |
| A little messy, but you can't see the cable tie. |
The patch runs around the left side of the neck and ends on the back midline:
I took several pictures of Rosa before I dressed her, too, so that you can see all of the body issues in context.
Here she is--standing on her own with her re-shaped ankles:
She still doesn't balance especially well, but at least she can stand on her own.
Here's a closer shot (and again--my apologies for the overexposure! I suppose I'm overcompensating for my old dark pics):
 |
| Ahhhh! I'm blinded by the light! |
Here's the front of the torso (with the side seams let out):
And here's the re-sewn back of the torso...
...with the neck patch at the top:
I wasn't completely happy with how Rosa's body came out, but at least it's clean! I washed and bleached all of the fabric and the stuffing.
I had some trouble with her little dress, too. It was just one of those projects.
Things were going fine with the dress until it came time to loop the elastic through the neck seam. I somehow managed to get the elastic in between two layers of fabric, and this caused some damage to the delicate gauze:
You can also see the elastic in the small section where it's only covered by one layer of fabric.
So, I decorated Rosa's dress with a design that would camouflage this mistake.
This dress has a more muted and delicate flower trim than what I usually use. I strategically placed several individual flowers around the neckline in order to hide (and reinforce) the flaw in the fabric:
My last Kid had a pink dress, too, so the color choice is a little boring here, but I wanted to use pink for Rosa because of her name. I also think the color looks nice with her hair:
This picture shows the color of the wig pretty well, and it also shows off the ombre effect at the ends of the hair:
You can see how many photography lights I'm using now because all of them are reflected in Rosa's eyes!
 |
| Overkill, Emily. Overkill. |
The new trim is a hand-dyed treat that I found on Etsy a few months ago. All of the trim is glued and then hand-sewn into place.
Rosa loves swishing around in her new dress!
The wig is really glorious and fun to play with, but I wanted to clip it back away from Rosa's face so that I could get some clearer portraits.
Here's her comparison GIF:
The before picture was taken in my old lighting set-up and had to be manually brightened. The after picture was taken in my new room and had to be manually darkened! There's a happy medium to be found in there somewhere.
I really like how Rosa looks with her hair clipped back, so here are a few more pictures with that hairstyle:
Here I've only clipped one side of the hair back, which I think adds a little bit of drama:
Ok, now I want to tell you about my exciting clothing news!
It's frustrating to me that there's no clothing for the My Way Kids on the current market, and my sewing skills are very limited. So, a few weeks ago I asked Julie from
Fairy Tale Blessings if she would be willing to try and make some cute, modern outfits for the My Way Kids.
Julie, being awesome and adventurous, agreed to this idea! She makes most of her own patterns and designs, so was able to create clothing that is fit specifically to the My Way Kid body. I sent her a doll (the one who used to have that strawberry blonde hair) and told her to have some fun.
Before I knew what was happening, she'd made me eight outfits! Eight!! She also agreed to let me share her photos of the outfits here on the blog.
Feast your eyes on these:
 |
| this is my favorite |
I wish I knew Julie's photography secret. All of these photos are great, and the skin tone on this doll (which is the same skin tone as Rosa's) looks almost exactly like it does in real life. I'm not able to do that for some reason.
 |
| I love this, too! |
I'm so used to seeing these dolls in that same old pink nightgown, it was a huge treat to see so many new options! Yay for Julie!
All of these outfits will appear at some point on one of the Kids I have for sale, and Julie can also make variations on any of these designs for anyone who is looking for a new wardrobe for their My Way Kid. Just please note that the clothes are made for a doll with the waist seams taken out. I think for most styles the thinner body would work just fine, but I do want to emphasize this.
Anyway, because Rosa has a flaw in the dress I made for her, I decided to give her one of Julie's outfits. When I sell her, she will come with both her pink dress and this jeans and top ensemble:
The style of the peasant top is similar to the dresses I make, but it has longer sleeves and a plastic snap in back for easier dressing.
The rose-covered top is perfect for Rosa, and I think it pairs really nicely with these cute little polka-dotted stretch jeans!
Rosa wanted to do some more modeling in this new outfit!
And with her hair back:
This oversized bow was meant to be worn with a different dress, but I really like how it goes with Rosa's curly hair, so I gave it to her:
The colors in the bow go well with the blouse, and it makes the whole ensemble even more fun:
I've shown you a lot of Rosa pictures already, so I decided not to take any outdoor photos this time around. The 100 degree heat here in New Jersey had something to do with that decision, too. It's pretty intense.
I'll end with this photo, which I really love. The My Way Kids are not very flexible, but a wig like this can really make them look dynamic:
It was very fun to work with the third and final face mold in the My Way Kid lineup. I was worried that Rosa wouldn't have nearly as much charm as her companions, with that serious face and pursed lips, but I actually like her sweet, contemplative expression. Her detailed mouth is also a refreshing change from the understated mouths of the other two faces. I look forward to working with this face again.
In fact, I look forward to doing any kind of work in my new studio. It's nothing fancy, but I feel like I have the space now to really dig in and accomplish some things. Next up will be the Rapunzel pictures (after I get my overexposed set-up under control) and then I can start working on Belle.
First, though, here's a summary of all the work that was done on Rosa:
-her head was removed from her body and the old wig and eyelashes were removed
-the pate was twisted off the head and the old eyes were taken out
-all factory paint was stripped, and I tried to sand away the glue residue on the eye sockets
-the body was taken apart and all fabric and stuffing was washed and treated with a mild bleach solution
-all vinyl parts were washed with Mr. Clean Magic Eraser
-the body was reassembled, and a patch was added to close a gap in the neck seam
-the vinyl ankles were heated and then cooled in a more flat-footed position
-the face was sprayed with Mr. Super Clear UV protectant sealant
-new glass eyes were placed into the sockets and glued at the back with hot glue
-the pate was glued to the head with a thin strip of hot glue
-the face was repainted, including lips, eyebrows, blush, and freckles
-new eyelashes were glued on with tacky glue (only on the top)
-a premium ZaZou wig was glued at the front and at the back
-Rosa is wearing a pink dress (made by me) with hand-dyed floral trim. This dress is paired with sandals that have matching flowers on the toes
-Rosa will also come with a blouse and jeans outfit made especially for her by Julie of
Fairy Tale Blessings. This outfit also includes a hair bow
-Rosa will come with a handmade beaded name bracelet (that I haven't made yet!)
Rosa is not perfect. Her neck joint gave me trouble, and so she has a fabric patch that extends from the back midline around to cover the cable tie at the side of her neck. She also has a horizontal gap at her neck seam that you can see in the pictures. There is a flaw in the construction of her dress, but it is covered with flower trim. Rosa does not balance very well on her own and I highly recommend the use of a doll stand to keep her safe.
These little dolls are a lot of work, but I still find them quite rewarding--especially with the help of Julie's bright, modern clothing! I hope you continue to enjoy seeing a few of these little ones appearing alongside the larger Twinns.
Rosa has sold. Thank you!


She's ADORABLE!! I love the outfits and I adored the pink dress you made, too. So light and summery and sweet.
ReplyDeleteAlways a joy to see and read about your creations, I'll be keeping an eye out on Etsy. Hope you are well and so glad to hear about the studio. -Micah
Thank you, dear Micah! I'm a little slow getting her on Etsy--sorry! Maybe this weekend will be the charm. :)
DeleteThe photos sharing your creations and rehabilitated dolls are always well worth the wait. And the honor of owning one (or more, oops) is just icing on the cake! : ) -Micah
DeleteShe‘s absolutely adorable 😍 I was not a huge fan of her face when I saw her first but you transformed her into such a sweet little character ❤️
ReplyDeleteThank you so much, Sév! The face is not as immediately appealing as the other two, but I wanted to give it a chance! I'm glad you like her. :)
DeleteSuch a sweet doll! I agree, that her face did not appeal to me at first, but her transformation has made her look very sweet and lovable!
ReplyDeleteThank you so much, Vera! The face is a bit too babyish for my imagined age of these Kids, but there's a sweet innocence to it, too!
DeleteShe's very cute now. The face mould looks kind of familiar, maybe it looks a bit more like a baby doll face mould than a child doll face? Something about the full cheeks and the mouth and lips shape perhaps.
ReplyDeleteYes, I totally agree! It has strong Lee Middleton baby doll vibes, doesn't it? Or maybe another baby doll brand that I'm not thinking of right now. But I did enjoy the challenge of painting a partially-open mouth!
DeleteOh, what an awesome makeover. She has so much more life with her new face, and I love the heck out of that wig. *applause*
ReplyDeleteThank you so much! :) It's truly a spectacular wig.
DeleteShe is adorable, and reminds me of the the toddlers I work with.
ReplyDeleteOh, that is a lovely compliment! Thank you. :)
DeleteI love her! And I'm happy every time you post a new doll =)
ReplyDeleteEmily, do you use a grey card when you take shoots? The colours looks perfect with that:
https://www.pixelz.com/blog/need-accurate-color-let-grey-cards-white-balancing-come-rescue/
Thank you, Lilium! I had never even heard of a grey card until now, but I already have one on order! THANK YOU! I'm also exploring some options with an old camera that I have. I'll get to the bottom of this some day! Lol.
DeleteOr maybe one of this: https://youtu.be/i8DuPM-CtCk
ReplyDeleteOk, I'm all over that, too! Awesome.
DeleteThank you, Linda! I'm so excited to have some new clothing choices for these cuties! I hope you had a good blog break and are ready to get back in the fray! ;D
ReplyDeleteShe is adorable Emily! We have one of these dolls and I have really been struggling with the baby face mold; it just seems so odd with the body type. So happy to hear you have your new studio up and running! We always look forward to your posts!- Cari and Anna :)
ReplyDelete